

Thank you for visiting this eBook design tutorial. We now have an eBook design startup—BB eBooks—dedicated to helping independent authors and small presses get their eBooks formatted, converted, and ready for sale at all the major online retailers (e.g. Amazon's Kindle Store, Barnes & Noble's Nook, iBookstore, Smashwords, etc.) Please contact us for a no-obligation quote. For those writers, editors, and publishers looking to go the DIY route for eBook production (you probably are if you visited this page), we offer free online tutorials and apps to help you professionally design your eBook. Please visit our Developers page and let’s work together to improve the overall standards of eBooks. Also, please sign up for the mailing list for promotions, design & marketing tips, plus eBook industry news.
Warning This Content is Out of Date. Please head on over to the BB eBooks Developers Page for the most up to date information on eBook creation.
The full tutorials for the eBook formatting series include a basic XHTML tutorial, a tutorial for converting your manuscript into XHTML, and a Calibre tutorial for converting XHTML into eBooks. For those looking for something more advanced, you can also peruse the Regular Expressions tutorial, as well as the EPUB and KindleGen tutorial. Templates for XHTML and EPUB are also available for your formatting arsenal. Additionally, there are some helpful hints for formatting for Smashwords in this tutorial.
Table of Contents for XHTML Tutorial
Introduction to XHTML
Basic XHTML structure
Paragraph and Break Tags
Styling Your Paragraphs
Italics/Bold/Underline in Paragraphs
Adjusting Font Sizes
Changing Margins around Paragraphs
Indenting
Text Alignment
Page Breaks
Altering Styles within a Paragraph
The <div>, <p>, and <span> Hierarchy
Adding a Cascading Style Sheet (CSS)
Bulleted and Numbered Lists
Adding Hyperlinks
Adding Anchors
Adding Images
Adding Comments
Special Characters
Using Non-breaking Spaces
XHTML Not Used in this Tutorial
XHTML and HTML Differences
Introduction to XHTML
To make a clean conversion from your word processor's document to an eBook, you need to first get it into XHTML format. This will strip out all the weird formatting and corruption that your word processing software has introduced. There are some online tools and software (such as word2cleanhtml.com) which automate this process, but they are not 100% reliable. By learning the basics of XHTML, you can make sure that your eBook is perfectly formatted for your readers.XHTML stands for "eXtensible HyperText Markup Language", and it can be viewed in any web browser (i.e. Internet Explorer, Firefox, Safari, etc.) You have probably heard of HTML, and XHTML is very similar but at a higher standard. XHTML is the guy at the party wearing a tuxedo, and HTML is the guy sporting the "I'm with Stupid" shirt.
This is where you need to put away the creative part of your brain as an author and channel your inner nerd. You need to get into a little bit of XHTML coding. By generating a clean XHTML file, this guarantees that Calibre will convert to the desired eBook formats exactly as planned. The EPUB format is actually based on XHTML, so the conversion process is bulletproof.
XHTML uses something called tags to define how you want the text to look in a web browser. Open any web page and hit Ctrl-U to view the source code. It may look a bit daunting, but you'll notice that there is a lot of text in between the <tag>xxx</tag>. The tags simply tell the web browser how to make the text look and what to make the text do (i.e. make the text italicized, create a hyperlink, etc.). There are a lot of different tags that a web browser can recognize, but to properly format an eBook, we just need to know a few basic ones and how to modify their values. Thank heavens, because you're trying to publish a book not go to MIT.
Basic XHTML structure
In this section you will start creating your own XHTML file in your text editor, which is the most critical step towards creating clean eBook formats. This guide uses Notepad++ (which is free) as the text editor, but any software that you prefer is okay. For the XHTML files you create and alter in your text editor, you can open the file in a web browser to see how it looks. This is analogous to how the eReader will see it. The most basic XHTML structure that will be recognized universally by Calibre and eReaders is below. (Note: this was copied off of the EPUB wikipedia page).
<?xml version="1.0" encoding="UTF-8" ?>Don't worry about too much about that frightening coding at the top. It basically tells your web browser that this is an XHTML document designed for viewing English language using standard characters found on English keyboards.
<!DOCTYPE html PUBLIC "-//W3C//DTD XHTML 1.1//EN" "http://www.w3.org/TR/xhtml11/DTD/xhtml11.dtd">
<html xmlns="http://www.w3.org/1999/xhtml" xml:lang="en">
<head>
<meta http-equiv="Content-Type" content="application/xhtml+xml; charset=utf-8" />
<title>Your Title Here</title>
</head>
<body>
</body>
</html>
In between the <title></title> tag is where you put, you guessed it, your title. This can be changed during the eBook conversion process. Between the <body> and </body> tag is where you want to place your text that will show up inside your web browser.
Let's say you have a hypothetical story. It is a tale of an elf who slays a vile oaf. In your word processor, the story looks as follows:
My Elf BookTry copying this story and pasting it in between the <body> and </body> tags inside your text editor. It should look something like this:
by Joe Selfpubber
Boring Copyright Info
Chapter 1
Initial Conflict
This is a paragraph in your manuscript. I can hear the guy next to me talking.
"Hey, I'm talking to you," the oaf said.
I hate being interrupted by this knucklehead. Now he must die.
Chapter 2
Death of the Oaf
I stabbed the man with my dagger. This is what elves do.
THE END
Author Notes:
Come to my website and leave a comment. My dayjob sucks.
<?xml version="1.0" encoding="UTF-8" ?>Now, save this file as somename.html in your text editor. In your web browser press Ctrl-O and open up somename.html. You'll notice that all the words are scrunched together, with no breaks in between.
<!DOCTYPE html PUBLIC "-//W3C//DTD XHTML 1.1//EN" "http://www.w3.org/TR/xhtml11/DTD/xhtml11.dtd">
<html xmlns="http://www.w3.org/1999/xhtml" xml:lang="en">
<head>
<meta http-equiv="Content-Type" content="application/xhtml+xml; charset=utf-8" />
<title>My Elf Story</title>
</head>
<body>
My Elf Book
by Joe Selfpubber
Boring Copyright Info
Chapter 1
Initial Conflict
This is a paragraph in your manuscript. I can hear the guy next to me talking.
"Hey, I'm talking to you," the oaf said.
I hate being interrupted by this knucklehead. Now he must die.
Chapter 2
Death of the Oaf
I stabbed the man with my dagger. This is what elves do.
THE END
Author Notes:
Come to my website and leave a comment. My dayjob sucks.
</body>
</html>
 |
| XHTML File in Web Browser – No Wrapping |
However, this is not at all how we want our elf story to look: the Chapter 1 heading should be on a different line than the content, the heading and content should be different fonts, "The End" should be centered, etc.
Unlike a word processor, you cannot go into a text editor containing your XHTML code and begin altering fonts, styles, and justification by highlighting the text and clicking on a few buttons in the menu. To alter the appearance of how a web browser reads the XHTML file, it is necessary to apply tags. The first step to accomplishing style changes for our story is to get paragraph tags <p> and </p> wrapped around every single paragraph.
Paragraph and Break Tags
To prevent all text from becoming one continuous line, you need to program into our text editor where each paragraph begins and where it ends. To do this you wrap each paragraph with <p> and </p> tags. Not only will this tell the web browser how to split up the paragraphs, it will also allow you to alter the style of individual paragraphs.Important Note: In XHTML, it is critical that you wrap everything in block type elements, which is essentially the process of ensuring that there isn't loose text without an XHTML tag telling it what to do. The <p> and </p> are examples of block type elements. For this guide, we will exclusively use <p> and </p> tags and to define our block type elements.
Wrapping paragraph tags properly in the XHTML of our elf story would look like this in our text editor. Note that there is no space between the tag and the text.
<p>My Elf Book</p>When your web browser views this XHTML file, it will recognize where each paragraph begins and where it ends.
<p>by Joe Selfpubber</p>
<p>Boring Copyright Info</p>
<p>Chapter 1</p>
<p>Initial Conflict</p>
<p>This is a paragraph in your manuscript. I can hear the guy next to me talking.</p>
<p>"Hey, I'm talking to you," the oaf said.</p>
<p>I hate being interrupted by this knucklehead. Now he must die.</p>
<p>Chapter 2</p>
<p>Death of the Oaf</p>
<p>I stabbed the man with my dagger. This is what elves do.</p>
<p>THE END</p>
<p>Author Notes:</p>
<p>Come to my website and leave a comment. My dayjob sucks.</p>
 |
| Text Wrapped in Paragraph Tags |
The viewing screen on the browser has been deliberately narrowed on the figure above to show you that the text for each paragraph flows naturally below it.
Web browsers add a margin of space between each paragraph when reading XHTML. Say that we don't want any space in between "Chapter 1" and "Initial Conflict" above. We want to force "Initial Conflict" to a new line directly below "Chapter 1", but not into a new paragraph. This is analogous to pressing Shift+Enter in a word processor.
To add a break, enter a Line Break tag <br /> where you want to force the text to a new line below. The code would change from:
<p>Chapter 1</p>To
<p>Initial Conflict</p>
<p>Chapter 1<br />Initial Conflict</p>
 |
| Use of the Line Break Tag |
Important note: There is always a space between the "<br" and the "/>". Failing to do so can create unclean XHTML code.
Styling Your Paragraphs
If you tried to create our story with all the same looking paragraphs, it would be the most terrible reading material ever. Thankfully, you can alter each paragraph to change the characteristics in regards to font size, indentation, justification, italics/bold/underlined text, margins, etc. You can make adjustments to your XHTML code that style the text in similar ways to a word processor.To accomplish style changes for your text, you must add properties and values within each <p> tag. As a general syntax, it reads:
<p style="property: value;">some text here</p>There are a number of different style properties that are supported by XHTML to change the characteristics of your text. A full list of all CSS properties, values, and syntax can be viewed at the website setup. To keep things simple for our eBook formatting guide, only a few basic properties will be discussed.
You can define more than one style within a <p> tag, and some example XHTML is as follows:
Important Note: Don't forget about the semicolon.<p style="property1: value1; property2: value2;">text</p>
Italics/Bold/Underline in Paragraphs
For XHTML coding, you can use the following style properties to change normal paragraphs into italics, bold, or underlined paragraphs within the <p> tags.Try altering each of the paragraphs in your elf story to create different combinations of italics/bold/underline text:style="font-style: italic;" for Italics textstyle="font-weight: bold;" for Bold Textstyle="text-decoration: underline;" for Underlined text
Hitting F5 to refresh your web browser, it reveals exactly what was intended.<p style="font-weight: bold;">My Elf Book</p><p style="font-style: italic;">by Joe Selfpubber</p><p style="text-decoration: underline;">Boring Copyright Info</p>
 |
| Italic/Bold/Underline Text |
Important Note: If you are familiar with HTML, you may know about the <i>, <b>, and <u> tags to get italics, bold, and underline texts. This guide prefers not to use those, as it will be easier to custom define your own italics, bold, and underlined styles when CSS Style Sheets are discussed.
Adjusting Font Sizes
You probably want the title of your eBook to appear larger than the rest of the text. Similar to a word processor's document, you could set paragraphs to specific fonts (e.g. 14pt, 18pt, etc.), but this is not the preferred method for eBook formatting. Since every eReading device has a default font size that is defined by the reader, you do not want to alter this size based on what you feel is best. It is much more reader-friendly to define font sizes based on the relative size of the reader's default font rather than a fixed size.Hypothetically, you would like the title of your text to be about twice as big as the body of your text. To change this style value, you should use what's called the "em" scale. A font-size of 1.0em is the base font size defined by the eReading device. By using different numbers of ems (1.0em=base size, 2.0em=double size or 200%, 0.5em=half size or 50%, etc.), you can adjust the look of your eBook without interfering with the readers default settings on their eReader. Using the em scale is known as relative sizing.
To alter the font size for the title, the XHTML code would look as follows:
<p style="font-size: 2em; font-weight: bold;">My Elf Book</p>
<p style="font-style: italic;">by Joe Selfpubber</p>
<p style="text-decoration: underline;">Boring Copyright Info</p>
 |
| Changing Font Size |
Changing Margins around Paragraphs
You can use the same relative sizing technique to adjust the margins around your paragraphs. Margins are defined as the whitespace between paragraph blocks (i.e. anything wrapped in <p> tags). As a good practice, the margin of space between a chapter and the body text should be greater than the margin of space between two paragraphs in the body.The property margin-top: 1.0em; will add a space of 1.0em above the first line of a paragraph, while the property margin-bottom: 1.5em; will add a space of 1.5em below the last line of the paragraph. You can combine the two properties into one paragraph if you want 1.0em above and 1.5em below on your margins.
To adjust the margins inside the elf story, here is how you would alter the <p> tags in the XHTML code:
<p style="margin-top: 1.0em; margin-bottom:1.5em;">Chapter 1<br />Initial Conflict</p><p style="margin-bottom: 1.0em;">This is a paragraph in your manuscript. I can hear the guy next to me talking.</p><p style="margin-bottom: 1.0em;">"Hey, I'm talking to you," the oaf said.</p><p style="margin-bottom: 1.0em;">I hate being interrupted by this knucklehead. Now he must die.</p>
 |
| Adjusting Top and Bottom Margins |
Important Note: This guide recommends not adjusting the left and right margins in the XHTML code when formatting for an eBook, as this can be accomplished in Calibre during the conversion process.
Indenting
To add indentations to your paragraphs, you simply use the property text-indent: xxem; in your paragraph tags. Indenting is different than a left or right margin, because it only indents the first line of the paragraph.There are two common types of paragraphs in the content of eBooks. There is First Line Indent, which is typically used for works of fiction. And there is Block Indent, which is typically used for works of non-fiction. To set these types correctly, you will need to adjust both the margins and the indentation of your paragraphs.
Please look at the following examples of XHTML coding for the paragraph types First Line Indent and Block Indent:
<p style="text-indent: 1.25em; margin-bottom: 0em;">This is a first line indent type paragraph. These are commonly used for fiction. I think they look nice in an eReader. I usually go for a 1.25 em indent like this one, but I've seen other people use 1.5em.</p>
<p style="text-indent: 1.25em; margin-bottom: 0em;"> You'll notice that there's no margin in between new paragraphs, unlike it's cousin the block paragraph below. However, some people like to put a small bottom margin of about 0.3em. I have no idea why.</p>
<p style="text-indent: 0em; margin-bottom: 1.0em;">This is a block paragraph. It is pretty good for non-fiction type work or, alternatively, Author's notes, Blog posts, and other things of a non-literary nature. Notice that the indent is set to 0em.</p>
<p style="text-indent: 0em; margin-bottom: 1.0em;">You'll notice that in block paragraph, there's a margin between two paragraphs. I did this by setting a margin-bottom: 1.0em; style. I usually go for 1em, but you can mess around with the style sheet to make it look how you want.</p>
 |
| First Line vs. Block Indenting |
Text Alignment
There are four options to align your text: left, right, center, and justify. Left justification has a ragged right edge, while justified justification makes the left and right edges of the text line up vertically. For paragraphs like chapter headings, section breaks, and the title, you probably want centered text.Getting back to your elf story, try adding different alignments to the first page to see how it affects your text:
<p style="text-align: left; font-weight: bold;">My Elf Book</p>
<p style="text-align: center; font-style: italic;">by Joe Selfpubber</p>
<p style="text-align: right; text-decoration: underline;">Boring Copyright Info</p>
 |
| Aligning Text in XHTML |
Important Note: Most eReaders display eBook in the justified format (i.e. both left and right sides of the text line up like in a newspaper). You do not need to incorporate this style into your XHTML coding, because Calibre can handle this during the conversion process. This guide recommends only changing alignment values for when you want text or images centered.
Page Breaks
It is advantageous to format your eBook with page breaks. When two chapters are on the same page, it is terribly sloppy formatting. You would almost never see this in a regular dead tree book. This guide recommends adding page breaks before all chapter headings and individual sections after the text.To add a page break, simply include the style property page-break-before: always; in a paragraph tag.
<p>Last paragraph in Chapter 31.</p>You will not see a page break in your web browser, however when you convert your XHTML to an eBook format, all eReading devices will recognize this code and insert a page break before the heading where the page-break-before: always; property is defined.
<p style="page-break-before: always;">Chapter 32</p>
Altering Styles within a Paragraph
You now are familiar with how to alter the style values for individual paragraphs. However, there are probably some instances in your eBook where you will want to change the style for either one or more words within a paragraph, but not the entire paragraph.In the Author's Notes of your elf story, perhaps you want to change the word "leave" to a bold "leave" and the words "dayjob sucks" to an italicized "dayjob sucks". You have to alter these individual terms within your paragraph to make them italicized and bold. This can be accomplished using the <span> </span> tags.
Text wrapped within the <span> tags can be styled using the exact same style properties learned up until now.
The XHTML code can be changed to this:
<p>Author's Notes:</p>
<p>Come to my website and <span style="font-weight: bold;">leave</span> a comment. My <span style="font-style: italic;">dayjob sucks</span>.</p>
 |
| Using <span> Tags within a Paragraph |
The <div>, <p>, and <span> Hierarchy
The <div>, <p>, and <span> tags all wrap around text in XHTML and allow style properties to be added so the web browser and eReader know how to display the text. However, these tags are employed across different lengths of text as follows:- <span> for text within a paragraph
- <p> for a paragraph
- <div> for multiple paragraphs (typically)
Please look at the following XHTML code as an example:
<div style="font-weight: bold; text-align: right;">
<p style="text-align: left;">Author's Notes:</p>
<p>Come to my <span style="font-weight: normal;">website</span> and leave a comment. My dayjob sucks.</p>
</div>
 |
| Use of the <div> Tag for Styling Multiple Paragraphs |
However, the precedence of your web browser reading the XHTML coding is 1) <span>, 2) <p>, and 3) <div>. For example, if you alter a style property in <span> that has a different value than what is defined in the <div> tag, your web browser will display the text with the value in the <span> tag.
To illustrate this hierarchy, examine the XHTML coding below where the <p> and <span> tags override the values defined in the <div> tag:
<div style="text-align: right; font-weight: bold;">
<p style="text-align: left;">Author's Notes:</p>
<p>Come to my <span style="font-weight: normal;">website</span> and leave a comment. My dayjob sucks.</p>
</div>
 |
| <div>, <p>, and <span> Precedence |
Adding a Cascading Style Sheet (CSS)
Now you know how to define all the necessary style properties with appropriate values for a clean eBook format. You may be attempted to get started with your project. However, your work may be thousands of lines of code if you are writing War and Peace Redux. To make your life easier, you can utilize what's called a Cascading Style Sheet or CSS. These allow you to define a style that is used repeatedly throughout your XHTML code.A style sheet allows you to predefine numerous properties and values into a class. This is useful if you want to apply the same styles over and over again in different paragraphs. A style sheet also lets you define the default attributes for the <p> tag by itself.
For example, say you wanted to apply a style for a section break so that it was centered, and had a margin above and below it. Your coding might look something like this:
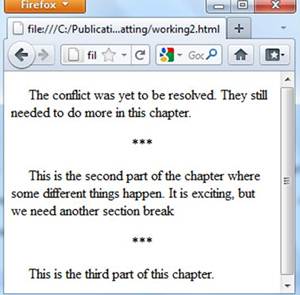
<p>The conflict was yet to be resolved. They still needed to do more in this chapter.</p>
<p style="text-indent: 0em; text-align: center; margin-bottom: 1em; margin-top: 1em;">***</p>
<p>This is the second part of the chapter where some different things happen. It is exciting, but we need another section break</p>
<p style="text-indent: 0em; text-align: center; margin-bottom: 1em; margin-top: 1em;">***</p>
<p>This is the third part of this chapter.</p>
 |
| Recurring Styles in One Paragraph |
If you have more than one section break in your work, it may be time consuming to add the style="property1: value1; property: value2;…" to each <p> tag of your section breaks. Also, what if you put all that code into your text editor, and you realize you didn't like how your section break looks in your eReader? You would have to go back and alter each section break manually, which would waste precious time.
By using a style sheet, you can create multiple styles within the <head></head> portion of the XHTML that can be applied by simply using the class attribute. The syntax of the XHTML is as follows:
<p class="stylename">text</p>Here is the full XHTML with some code for a CSS style sheet that defines a class sctnbrk:
<?xml version="1.0" encoding="UTF-8" ?>If you put this XHTML code in your text editor and pull up your web browser, it will look exactly the same as the figure aboce.
<!DOCTYPE html PUBLIC "-//W3C//DTD XHTML 1.1//EN" "http://www.w3.org/TR/xhtml11/DTD/xhtml11.dtd">
<html xmlns="http://www.w3.org/1999/xhtml" xml:lang="en">
<head>
<meta http-equiv="Content-Type" content="application/xhtml+xml; charset=utf-8" />
<title>My Elf Story</title>
<style type="text/css">
p.sctnbrk
{
text-indent: 0em;
text-align: center;
margin-bottom: 1em;
margin-top: 1em;
}
</style>
</head>
<body>
<p>The conflict was yet to be resolved. They still needed to do more in this chapter.</p>
<p class="sctnbrk">***</p>
<p>This is the second part of the chapter where some different things happen. It is exciting, but we need another section break</p>
<p class="sctnbrk">***</p>
<p>This is the third part of this chapter.</p>
</body>
</html>
The default <p> tag for web browsers and eReaders (i.e. the paragraph tags with no style="property: value;" and no class="stylename") may not be suitable for your eBook. It typically has no indentation and a space between each paragraph. If you are formatting an eBook of fiction, you probably want an indent of 1.25em or 1.5em for the start of every paragraph to have First Line Indent. It is possible to adjust the default attributes of the <p> tag in the style sheet.
You can accomplish this by defining the style p in the CSS. An example of the full XHTML code is as follows:
<?xml version="1.0" encoding="UTF-8" ?>
<!DOCTYPE html PUBLIC "-//W3C//DTD XHTML 1.1//EN" "http://www.w3.org/TR/xhtml11/DTD/xhtml11.dtd">
<html xmlns="http://www.w3.org/1999/xhtml" xml:lang="en">
<head>
<meta http-equiv="Content-Type" content="application/xhtml+xml; charset=utf-8" />
<style type="text/css">
p
{
text-indent: 1.25em;
}
p.sctnbrk
{
text-indent: 0em;
text-align: center;
margin-bottom: 1em;
margin-top: 1em;
}
</style>
</head>
<body>
<p>The conflict was yet to be resolved. They still needed to do more in this chapter.</p>
<p class="sctnbrk">***</p>
<p>This is the second part of the chapter where some different things happen. It is exciting, but we need another section break</p>
<p class="sctnbrk">***</p>
<p>This is the third part of this chapter.</p>
</body>
</html>
 |
| CSS Implementation and Altering the Default <p> |
You can define multiple style classes for how you want the eBook to look and how you want to manipulate paragraphs. You should feel comfortable adjusting the values and adding new properties in the CSS for what is best for you and your readers.
Bulleted and Numbered Lists
Now that you know how to easily create styles and manipulate values for your paragraphs, you should learn a little bit about the bells and whistles of XHTML. An ordered list (numbers 1, 2, 3 in a vertical line) and unordered list (bullet points in a vertical line) is a feature which may be useful to you if you are making a non-fiction eBook.You can generate an ordered list and unordered list by writing the following XHTML code into your text editor:
<p>Things to do today in order:</p>
<ol><li>Write 1,000 words</li>
<li>Check Email</li>
<li>Tweet to followers about new book</li>
</ol>
<p>It should be a fun day.</p>
You can generate an unordered list with the following code:
<p>Things to do today in no particular order:</p>
<ul><li>Write 1,000 words</li>
<li>Check Email</li>
<li>Tweet to followers about new book</li>
</ul>
<p>It should be a fun day.</p>
 |
| Ordered and Unordered Lists |
<p>Things to do today in order:</p>
<ol><li style="font-weight: bold;">Write 1,000 words</li>
<li>Check Email</li>
<li>Tweet to followers about new book</li>
</ol>
<p>It should be a fun day.</p>
 |
| Ordered List with In-line Styles |
Important Note: Do not wrap the contents of an entire ordered or unordered list within <p> tags (i.e. <p><ol><li>First thing</li> <li>second thing</li> </ol></p>). This is improper XHTML coding. If you want to define a style for multiple lists use the <div> tags.
It is also possible to have a list within a list, which is referred to as a nested list. This is accomplished by properly nesting the appropriate list tags. Here is an example:
<p>Things to do today in order:</p>
<ol><li style="font-weight:bold;">Write 1,000 words</li><li>Check Email<ul><li>See if JA Konrath returned my email</li><li> See if my ex-wife is after me</li></ul></li><li>Tweet to followers about new book</li></ol><p>It should be a fun day.</p>
 |
| Nested Lists |
Adding Hyperlinks
Everyone likes functionality in their eBooks and being able to visit other sites on the web with the tap of a finger. This gives eBooks a serious edge over their dead tree cousins languishing on bookshelves. This guide recommends not going overboard with the hyperlinks, because some of us have stubby fingers, and you don't want your readers to bring them up accidentally.For hyperlinks, you can add either websites (http://website.com) or email addresses (mailto:joeselfpubber@gmail.com). Be sure to add the http:// or mailto: before your hyperlinks, or else it will fail the EPUB validation.
Say you want to hyperlink the phrase "website" with http://elfsite.com and "comment" with a hyperlink that opens the readers email application with an email address joeselfpubber@gmail.com in the TO: block. The XHTML would be as follows:
<p>Come to my <a href="http://elfsite.com">website</a> and leave a <a href="mailto:joeselfpubber@gmail.com">comment</a>. My dayjob sucks.</p>
 |
| Adding Hyperlinks |
By clicking on "website" you will be taken to http://elfsite.com, and by clicking "comment", it will pull up your email client with joeselfpubber@gmail.com in the TO: block.
Adding Anchors
Anchors are targets for hyperlinks that are within the document itself. This is an important feature for eBooks, because you may choose to do your own Table of Contents manually. As an example in this guide, you can click on this hyperlink and go to the top of this blog post. There is coding in this guide that has marked an anchor at the top, and coding that has marked the hyperlink to go to the anchor.To define an anchor anywhere within the body of your XHTML code, you add
<a id="anchorname">anchored text</a>or, alternatively
<div id="anchorname">anchored text</div>To hyperlink within the document, it is not necessary to specify the location http://location.com. Rather, the code would look as follows:
<a href="#anchorname">linked text</a>By clicking on the linked text, the reader will be transported to the anchored text.
Perhaps you want to link to Chapter 1 in the last line of the world's most terrible story. The XHTML code would look as follows:
<p>The World's Shortest Story</p><div id="c1"><p>Chapter 1</p></div><p>Woe is I. I perish.</p><p>Go back to <a href="#c1">the start of the chapter</a>.</p>
 |
| Anchored Text and Hyperlink Example |
Important Note: This guide recommends using <a id="anchorname"> and not <a name="anchorname">, because a bunch of smart people got together and decided that the <a name> was going to be phased out for XHTML.
Adding Images
Displaying images in eBooks can provide helpful visual aids if you are formatting non-fiction. Also, images can help jazz up your fiction to impress your readers. Unfortunately, eReaders, particularly the Kindle, are very limited in their functionality of handling images. Websites are often designed to wrap text around an image, known as "floating", and there are extensive attributes you can modify in XHTML to achieve this. However, the MOBI format does not support floating images, which is the format utilized by the biggest eBook market - the Amazon.com Kindle store.Therefore, you have to keep things very basic when adding images to your eBooks to ensure that all readers can properly view them. You also want to keep images small for two reasons: 1) so the file size of your eBook is as small as possible and 2) so an image won't take up the entire viewing screen of an eBook (with the exception of the cover image).
This guide recommends keeping the longest length of any image at 300px or smaller. This prevents the smaller eReading devices from becoming overwhelmed by an image. Also, the recommended format for most images is JPEG, since they tend to be of decent quality while remaining small in file size. GIF is good for text with lines in it (such as images resembling an Excel spreadsheet). The GIF formatting prevents blurring on lines. PNG is the highest quality and therefore the biggest file size, but it may be good if you want a real sharp logo somewhere in your eBook.
Perhaps you have some pictures you took with a digital camera that you would like in your eBook but they are 2MB in size and 2048x1536px. Do not try to insert these images into your eBook directly. You should first compress them to smaller dimensions and a smaller file size in a suitable photo editing program like Photoscape, which is free.
The general syntax of XHTML code to insert an image is:
The filename must be exactly correct, and the image file must be in the same directory on your computer as the XHTML file. Note that the alt attribute to define an alternative text description is required for EPUB validation. You can write any text you want.<img src="filename.jpg" alt="image description" />
As an example, there is a compressed picture of 100x75px named "monica.jpg". You want to make sure that the JPEG is in the same directory as your XHTML file on your hard drive.
Here is an example of the XHTML code to add this picture:
<p>Below is a picture I took.</p><p><img src="monica.jpg" alt="A Picture of Baby" /></p><p>Caption: A picture of my daughter</p>
 |
| Inserting Images |
To align the image to the left, right, or center, you simply add the style="text-align: value;" or class="stylename" attributes into the <p> tag that wraps the image. You can also add other values to adjust the margins above and below an image. This is useful if you want the caption to be right below the image.
As an example:
<p>Below is a picture I took.</p><p style="text-align: center; margin-bottom: 0em;"><img src="monica.jpg" alt="A Picture of Baby" /></p><p>Caption: A picture of my daughter</p>
 |
| Aligning and Adjusting Margins for Images |
If you have a number of images throughout your eBook, such as vignettes for chapter headings, it is a good idea to create a separate CSS style just for images.
Important Note: For XHTML, images must be wrapped in <p> tags or they will fail XHTML validation. Also, you must have the alt="image description" added or it will fail EPUB validation.
Adding Comments
Comments can be inserted inside the XHTML code and the CSS to help you as you program your eBook. The web browser and eReader will ignore anything inside these tags, so go nuts.
For everywhere except within the <style> </style> tags of the CSS:
Within the CSS:<!--Your Comment Here-->
The comments can span across multiple lines within your text editor. Here is an example of a properly inserted comment inside the XHTML code:/*Your Comment Here*/
<p>Chapter 2</p><!--I should come back an insert a vignette graphic here later--><p>This is the text of chapter 2</p>
 |
| Comments Not Displayed in Web Browser or eReader |
Special Characters
Special characters can be roughly defined as characters that are not one of the keys on a standard English keyboard (i.e. any characters that aren't here are special). This definition is rather crude, but the history and complete understanding of this goes way behind this guide.Special characters include foreign language characters like the "ï" in "naïve". Special characters also include the curled quotes (also referred to as fancy quotes or smart quotes), en dashes, em dashes, and ellipses that Microsoft Word likes to put in automatically unless you disable your Autoformatting options.
Here is an example of the fancy special characters versus the normal characters so you can observe the differences:
In regards to best formatting practices, readers seem to prefer the "fancy" characters for double quotes, single quotes, en dashes, em dashes, apostrophes, and ellipses. Since you want to impress the customer with your eBook, it is necessary to incorporate these special characters into the XHTML coding.Special Characters:“ ” ‘ ’ … – —Normal Characters:" " ' ' ... - --
If you try to put the following paragraph with fancy Special Characters into XHTML code, you will get very problematic results:
<p>“You are such an imbecile,” Jim’s mother said. “How could you be so naïve.”</p>
 |
| Problems with Special Characters in XHTML Code |
Obviously, your readers would think you were a real bozo if you tried to sell them this eBook. Some eReaders do recognize special characters within the XHTML code (like Kindle), but some do not. You want to make one clean XHTML file for all formats, so you need to add special code called HTML Entities to replace all special characters that you want to use. It is also necessary to use HTML Entities to replace certain normal characters like <, >, and &, since those are used in the programming of XHTML.
The HTML Entity Name codes for some common special characters in eBooks are as follows:
- less than <: <
- greater than >: >
- ampersand &: "&
- non-breaking space " ":
- left fancy double quote “: “
- right fancy double quote ”: ”
- left fancy single quote ‘: ‘
- right fancy single quote and apostrophe ’: ’
- ellipsis …: …
- en dash –: –
- em dash —: —
- umlaut ï: ï
After replacing the special characters with the HTML Entity Name codes in your XHTML, an example of the code would be as follows:
Important Note: When performing this task, be careful not to add unwanted spaces in between the HTML Entity Name code and your text.
<p>“You are such an imbecile,” Jim’s mother said. “How could you be so naïve.”</p>
 |
| Properly Coded Special Characters in XHTML |
The XHTML coding itself might look messy, but it looks perfect inside your web browser. Therefore, it will look perfect inside all eReaders, which is what is important.
Important Note: Use the HTML Entity Name Codes (e.g. —), not the HTML Entity Number Codes (e.g. —). The number codes are buggy when converting to the EPUB format.
Using Non-breaking Spaces
For both web browsers and eReaders, they are designed to read only one blank space at a time. Trying to press the spacebar 10 times inside paragraph tags will result in your web browser only reading one of them. If the spaces are at the beginning of a paragraph, your web browser will read none of them.This feature can be especially problematic when formatting poetry. Often it is advantageous to not use the margin-left: value; property, because many eReaders (the Kindle being the notorious offender) have a habit of not properly inserting the margins. Depending on the style of the poem, it is necessary to offset one line from another with non-breaking spaces.
For example, you are trying to insert four spaces on the second and third lines of poetry. You may be attempted to try the following XHTML coding for the world's worst poem:
<p>Woe is I upon this rock cliff,</p>
<p> It comes to pass abruptly,</p>
<p> Have I reached the bitter end?</p>
 |
| Improper Use of Spaces in XHTML |
To properly add four spaces on the second and third lines, use the following code:
<p>Woe is I upon this rock cliff,</p><p> It comes to pass abruptly,</p><p> Have I reached the bitter end?</p>
 |
| Proper Use of Non-breaking Spaces |
Non-breaking spaces are also useful when you want to have a space in between text like "5 oz." or "10 lbs." and ensure that it doesn't get broken across two different lines in a web browser or eReader.
XHTML Not Used in this Tutorial
For those of you with some HTML/XHTML experience, you may notice that there are a few things left out in this guide.Heading Tags (<h1>, <h2>, etc.): For the purpose of this guide, it only uses <p> tags with adjusted styles to get the proper headings desired. The guide's author has found that using the <h1> and <h2> can have unpredictable and frustrating results when converting from XHTML to eBook formats.
Colors: Applying color styles to text just looks ugly inside eReading devices. This is especially true for the Kindle, which is a gray-scale eReader. This guide recommends avoiding the use of applying color styles to your text.
Image Alignment: In older versions of HTML, you can use the align attribute to position the image to where you desire. However, the align attribute is becoming deprecated, which means a bunch of smart people got together and decided that this coding was going to be phased out sometime in the future. To align an image in an eBook, use the style or class attribute with proper CSS syntax within the <p> tags wrapped around the image instead.
Font Families: This guide recommends not adjusting the font family for your text (e.g. style="font-family: times, serif;"), because this dictates what the reader's font will be on their eReading device. This may cause a less than enjoyable experience for the reader. For example, if you forced all your text into the Courier family, but the reader prefers Times New Roman, you may look foolish. Let the customer decide. If you are interested in embedding fonts within your eBook, see this post.
Applying Margins for the Entire eBook: In some cases, you may want to apply margins on the left, right, top, and bottom so that the text is not butting up against the edge of the eReading device. This guide prefers to adjust those types of margins within the Calibre program.
Line Spacing: When formatting your eBook, you may want to add line spacing in between each line of a paragraph. This guide recommends adjusting that value in Calibre.
XHTML and HTML Differences
This is an important note for those somewhat familiar with HTML. The major differences between XHTML and HTML are as follows:Lower Case Only for XHTML tags:
- Good: <span class="mystyle">text</span>
- Bad: <SPAN class="mystyle">text</SPAN>
- Good: <p><span class="mystyle">text</span></p>
- Bad: <p><span class="mystyle">text</p></span>
- Good: <br /> and <img src="mymug.jpg" />
- Bad: <br> and <img src="mymug.jpg">
- Good: <p>This is sentence 1. This is sentence 2</p><p>This is the sentence in another paragraph.</p>
- Bad: <p>This is sentence 1.</p> This is sentence 2. <p>This is the sentence in another paragraph.</p>
12 comments:
Thanks so much for this helpful guide! I followed the kink here from http://www.lindsayburoker.com/ and have to say it's allowed me to format my writing far easier than I would have otherwise. And, since XHTML is so easy, I doubt I'll have any trouble learning the rest of it!
Thanks again!
I am glad you appreciate it. Let me know if I can clarify anything that might be confusing.
Great tutorial. I have a ton of experience coding in HTML and CSS, so there wasn't anything new for me here, but it's interesting to see what kind of restrictions I have to be aware of when coding my eBook.
On the subject of H1s and H2s, what do you mean when you say "unpredictable results"? Could I, for instance, set the style to an exact look, so that it looks the same on all devices? I know that The default styles can differ, but if I specify the font-family and font-size etc., then wouldn't this make the headings "predictable" again?
Glad these were useful. If you use h1 and h2 tags, they tend to be read differently on various eReading devices. You can try zeroing their margins and padding out with a reset in the CSS, and then adding declarations later on in the CSS. That seems to work okay. Your method sounds okay. Be careful with Font-family for the Kindle. I've only managed to get two fonts to work: the default one and a monospaced font which looks like ass, but I needed to use for the eBook version of this guide. Let me know how your h1 and h2 coding works out. I'm curious.
Shame about the constant spam comments ;/ Can you remove the option for anonymous comments or something?
Thanks for the helpful article. I'm now converting to ebooks, but I'd been fighting with trying to indent multiple lines within a "span" tag and your post showed me what I'd been doing wrong - changed it to a "div" and all's fine :)
Guess that makes me more of a "div" for not knowing to start with ;-)
woops, that was meant to say "I'm NOT converting to ebooks" - sorry.
I knew nothing about HTML. Apart from using some Word VB, I've done practically no programming for many years.
hint: (in my computer programming 101 course, the school where I received my non-computer science bachelor's degree from had my fellow students and I translating the Pascal code we were writing into pseudo code so it would run on the school's fortran compiler.)
I've been banging the kinks out of my method for putting e-books together with for quite some time. Most of that's done to my satisfaction.
The final step was learning the small bit of HTML you need to know to complete the process.
I couldn't get the code example published on most site on the web to run. I have access to lots of books on HTML, but was unable to find anything that corrected the syntax errors I was using.
It took me about 30 minutes, here on your site to identify what I was doing wrong and what I wasn't doing right. Prior to that I wasted a full week on research with the wrong materials and at the wrong sites.
Thanks for the clearly illustrated examples and well-written descriptions.
-RM-wb-
Haha, I remember Fortran and Pascal. Yeah, I'm getting old myself. Anyhoo, we've actually got a newer HTML tutorial if you're interested.
http://bbebooksthailand.com/developers.html
But, I'm glad this one has helped you.
Howdy very nice website!! Man .. Beautiful .. Wonderful .. I'll bookmark your blog and take the feeds additionally…I am glad
to search out so many helpful information right here in the publish, we'd like develop extra techniques in this regard, thanks for sharing. Check business phone calls for best Calls.
Post a Comment