February 5, 2012

Working with Images on the Kindle Fire


Thank you for visiting this eBook design tutorial. We now have an eBook design startup—BB eBooks—dedicated to helping independent authors and small presses get their eBooks formatted, converted, and ready for sale at all the major online retailers (e.g. Amazon's Kindle Store, Barnes & Noble's Nook, iBookstore, Smashwords, etc.) Please contact us for a no-obligation quote. For those writers, editors, and publishers looking to go the DIY route for eBook production (you probably are if you visited this page), we offer free online tutorials and apps to help you professionally design your eBook. Please visit our Developers page and let’s work together to improve the overall standards of eBooks. Also, please sign up for the mailing list for promotions, design & marketing tips, plus eBook industry news.


Looking for a complete guide on eBook design and development? Please consider The eBook Design and Development Guide, which contains everything you need to know about HTML, CSS, EPUB, and MOBI/KF8 to make an eBook like a pro. Pick it up at Amazon for $6.99 today.

Previous Post: Introduction to HTML for the Kindle Fire

Whether a vignette in between section breaks or a portrait of yourself playing with your cats in your workspace, images are a way to spice up your manuscript and make your eBook a more enjoyable read. While the e-ink Kindles are grayscale, the Kindle Fire, as well as other eReading devices like the Nook Color, iPad, etc., are in color. You don't need to be too concerned about including color images for some devices and grayscale images for others, because the e-ink Kindles will automatically convert color images to grayscale.

Images can be a bit tricky to work with, particularly when making them viewable on older Kindles, but they are well worth the time and effort. Do yourself a favor and get some free software such as Photoscape, to resize your images and convert them to various different formats. It may also be worthwhile to learn how to create your own images using Gimp (free) or Photoshop (expensive). For those not artistically inclined, public domain images can be acquired for commercial use at Wikipedia or at Open Clip Art. You can also purchase images for royalty-free usage at sites like iStockphoto or Dreamstime.

Important Note: Images that are used in eBooks should always be saved in RGB color model rather than CMYK, because CMYK is strictly for printing purposes. Also, Amazon advises saving images as 300 pixels per inch (300 ppi).

Image Formats Supported by Kindle


You should be aware of the different formats of images, because they should be chosen based on what type of imagery you are trying to display to your readers. The Kindle Fire supports four different formats as follows:
GIF: 256-color format that is suitable for line art, tables, and graphical text.
JPG: 16 million-color image format that can be degraded in quality to keep the size small. JPG is the most used image format and is suitable for photographs and artwork
PNG: high-quality, big-file size image format that can be used for logos, small complex images, and anything you want to look sharp.
BMP: Uncompressed image format (recommend never using due to its large file size).
SVG: Scalable Vector Graphics format that is composed of XML describing how the two-dimensional canvas should be drawn rather than pixels. As the name implies, it can be scaled to any size. This format is only supported on the Kindle Fire.

Size Does Matter for eBook Images


Why not just use the high-quality PNG format for all your images to give your readers the most sharp reading experience? Unfortunately, PNG images tend to be much larger in size than JPGs and GIFs, and the Kindles have limited space. You want to keep the size of your image files as small as possible without sacrificing too much quality. Many readers will be downloading your eBook via a cellular connection or through a crummy wireless connection at the local Starbucks. If your eBook is a huge clunker that takes up the same amount of space as a full-length movie, your reader may have a bad first impression waiting for the eBook file to download to their device.

Most importantly, size costs money. Amazon has a policy of charging a "delivery fee" to the publisher based on the size of your eBook for each one sold. It is currently $0.15/MB for any eBook with the 70% royalty option (typically eBooks selling at $2.99 or higher). So, if you are trying to sell a 5MB eBook, you would lose 75 cents per eBook. It may not sound like much, but if you plan on selling a thousand eBooks, that's $750—a full rent check for most of us. Beware of the size of your eBook.

Here are some tips to keep the file size of your images minimized:
  1. For line-art, tables, and images that are text-heavy, use the GIF format, which doesn't have many colors.
  2. Always consider degrading the quality of your JPGs with photo-editing software (simply cutting down the quality from 100% to 90% can half the size of the image file in some cases)/
  3. Only use PNGs or SVGs when you need an image to look sharp (like your personalized logo).
  4. Always cut down the image height and width to the size you want it to appear on the Kindle Fire. Since the Kindle Fire viewport is 1024x600px, you never need an image bigger than those dimensions (not applicable to the SVG format since it can be scaled to any size).
  5. Amazon Kindle allows image sizes up to 256KB, but you should get each image much smaller than that. When the MOBI/KF8 eBooks is compiled, KindleGen automatically converts images greater than 127KB to a smaller size.
  6. The cover image should be exactly 600x800px. A nice cover image will typically be in between 80-127KB.
  7. Images within the eBook (except for the cover image) should be no bigger than 500x600px so they work properly and don't get automatically converted on older e-ink Kindles with the 524x640px viewport.

Adding Images to Your eBook


Now that you understand the various formats and how to minimize the size, it's time to start adding them into your HTML markup. The HTML tag is simply <img />; however, it's important that you include attributes. HTML attributes provide additional information about the particular element they reside in. For example, here is some markup that tells the browser or eReading device to insert the tree.gif image in the images directory with a description of "A Picture of a Tree".
<img alt="A Picture of a Tree" src="images/tree.gif" />
The src attribute (pronounced "source") defines the directory and the image filename, while the alt attribute provides an alternative description of the image in case the browser or eReader cannot render it properly. The file directory specified in the src attribute is relative to the directory where the HTML file is located. So, if your html file is in c:/temp/myebook.html, the tree image would be in c:/temp/images/tree.gif. You always need to include the alt attribute for images in order for your eBook to pass EPUB validation.

Important Note: The filename and directory specified in the src attribute is case sensitive.

Try adding an image into the elf story to see how it looks in your browser. Some example HTML would be as follows:
<p>It was not a good time for the elves residing in the woods. The warlocks had poisoned their fields and stolen all their food, the bastards.<img src="images/tree.gif" alt="A Picture of a Tree" /></p>
<p>By the time the manuscript got around to the second paragraph, everyone but one elf was dead—what a shame!</p>
Example of an Image In-Line with the Content
If you want to have the image function like a block element and not be placed in-line with the text, you can wrap paragraph tags around it like so:
<p>It was not a good time for the elves residing in the woods. The warlocks had poisoned their fields and stolen all their food, the bastards.</p>
<p><img src="images/tree.gif" alt="A Picture of a Tree" /></p>
<p>By the time the manuscript got around to the second paragraph, everyone but one elf was dead—what a shame!</p>
Example of an Image Acting Like a Block Element
In general, you should wrap the self-closing <img /> tag in paragraph tags to make it function like a block element. By using CSS to adjust the paragraph tags, you can wrap text around the image, align it, and even add drop shadows. Unfortunately, for the older e-ink Kindles, they have very limited support for where you can place the image. They must not be "floated", which means they cannot have text wrapping around them. This makes fancy typography like drop-caps impossible. There is also the problem of the older e-ink Kindles randomly resizing your images.

Avoid Automatic Resizing of Images on Old Kindles


The tree.gif image used in the above example is 179x145 pixels. Once the MOBI/KF8 file is compiled, the tree image will look okay in the Kindle Fire as well as the Kindle apps for iPhone, iPad, and Android. However, the older e-ink Kindle will completely bloat the dimensions of the image, making the aspect look ridiculous and the image appear grainy.
Example of Image Mangling in Older Kindles
To avoid the maddening automatic resizing of images on older e-ink Kindles, you can specify height and width attributes. This forces the image to display with its exact dimensions. An example of the markup for the 179x145px tree image would be as follows:
<p><img alt="A Picture of a Tree" height="145" src="images/tree.gif" width="179" /></p>
Proper Image Resizing for Older Kindles

Tip: The order of attributes does not matter inside HTML elements. For example, you could have specified the width attribute before the height attribute, and the HTML markup would be perfectly valid.

Special Note on Using SVG Images for the Kindle Fire


Since SVG images can be scaled to any size, you should always specify either a height or width attribute within the <img /> tag. By only specifying one of the attributes, the aspect of the SVG will be maintained. Some example HTML markup for an image called fancytree.svg would be as follows:
<p><img src="images/fancytree.svg" height="200" alt="A Picture of a Tree with Awesome SVG" /></p>
An SVG Image in the Kindle Fire

Unfortunately, SVG images are only supported in the Kindle Fire. Older e-ink Kindles (including the Kindle App for the iPad and iPhone) will completely ignore them and not even display the description in the alt attribute. Once you master CSS, you will learn some tricks to show the SVG image for readers with the Kindle Fire, while providing a fallback JPG or GIF for readers with older Kindles.


Next Post: Adding Audio and Video Content to Your eBook for the Kindle Fire

Share/Bookmark

January 26, 2012

HTML Tutorial for the Kindle Fire (Part 1)


Thank you for visiting this eBook design tutorial. We now have an eBook design startup—BB eBooks—dedicated to helping independent authors and small presses get their eBooks formatted, converted, and ready for sale at all the major online retailers (e.g. Amazon's Kindle Store, Barnes & Noble's Nook, iBookstore, Smashwords, etc.) Please contact us for a no-obligation quote. For those writers, editors, and publishers looking to go the DIY route for eBook production (you probably are if you visited this page), we offer free online tutorials and apps to help you professionally design your eBook. Please visit our Developers page and let’s work together to improve the overall standards of eBooks. Also, please sign up for the mailing list for promotions, design & marketing tips, plus eBook industry news.


Looking for a complete guide on eBook design and development? Please consider The eBook Design and Development Guide, which contains everything you need to know about HTML, CSS, EPUB, and MOBI/KF8 to make an eBook like a pro. Pick it up at Amazon for $6.99 today.

Previous Post: Introduction to the Kindle Fire

Introduction to HTML


HTML is the markup language of the internet and of eBooks. It is the language that determines how web browsers and eReading devices render the content to show to the user. Go to any website in the web browser of your choice and press CTRL+U, and you will see the HTML source code. It may appear a bit daunting at first, but if you break it down into small little pieces, you will begin to have a basic understanding of how to convert your manuscript into the HTML necessary for a beautifully designed eBook.

The official syntax for how HTML should be structured is defined by a published, open-source specification. The World Wide Web Consortium (or W3C) is a group of internet architects, web developers, tech industry experts, and other smart folks who determine this specification. The smart people working with Apple, Mozilla, and Google who develop web browsers (e.g. Safari, Chrome, Firefox, etc.) use this specification to create their product that gets used by billions of people throughout the world. Also, web designers and developers use this specification to create websites.

XHTML was an HTML specification finalized by the W3C in 2001, and it was utilized by many developers throughout the last decade to create websites. However, XHTML is being phased out in favor of HTML5, which has better support for audio and video, working with files, and a myriad of other new features that users are demanding. The HTML5 specification is still under development, but all browsers support at least some elements of it. eReading devices are also transitioning from XHTML to HTML5. This is a process that doesn't happen overnight, which is why eReaders like Kindle Fire support XHTML with some HTML5 elements thrown in. All of this technology and geek politics can be a bit hand-wringing at times. In order to prevent confusion, this guide will simply refer to everything as HTML.

In website design and development, it is considered a best practice to separate code for "content" and "presentation"--the same is true for eBook design. From an author's point of view, an example of "content" would be the paragraph of text in a chapter. An example of "presentation" would be the authoring desiring design characteristics for that paragraph of text such as a serif font, an indent on the first line of text, the paragraph becoming fully-justified, etc. For eBook design, content is specified in the HTML and presentation is specified in the CSS, which will be covered later.

In order that eBooks are reflowable, it is necessary to convert the content of your eBook into HTML. You should most certainly not save your manuscript in your word processor or PDF as an HTML file. Direct conversion from the proprietary formats into HTML is god awful, to say the least. By learning the basics of HTML, you will be able to convert your manuscript into a professional eBook manually, and the end result will look beautiful to your readers. So, let's get started.

Tools Recommended


Along with your word processing software that you use, here are some additional tools recommended to begin designing your eBook. Don't worry, they are all free.
  1. Text editor (Notepad++ [free], TextWrangler for Mac users [free]
  2. Adobe Digital Editions (previews EPUB files [free])
  3. Kindle Previewer (previews KF8/MOBI files [free])
  4. Gimp (for image design [free])
  5. Photoscape (Windows) or Picasa (Mac) (for resizing and manipulating images [free])
Some small presses and self-publishers like to use Adobe InDesign. It is a very fancy (and very expensive) software package used by many professional publishing companies. You do not need this program to make a professional eBook. If you would like to learn about using Adobe InDesign to create an eBook, I recommend Liz Castro's publications on the subject; however, we will not discuss Adobe InDesign in this guide. Although, if your source file was created in Adobe InDesign instead of text in a word processor, you can utilize that in the design workflow for your eBook throughout this guide.

The recommended web browsers are either Google Chrome or Safari. This is because they use the WebKit engine, which is the same software used by the Kindle Fire. A web browser is a good place to start first looking at your eBook before you compile it into the KF8/MOBI format. However, if you are a dedicated Firefox user, that browser should work fine as well. This guide does not recommend using Internet Explorer, ever.

HTML Structure


An HTML file is simply a text file with a .html extension. It is divided into two parts: the head section and the body section. The head section contains metadata, instructions to the web browser or eReader on how to read the HTML code, and other information that is not content displayed to the reader. The body section contains that actual marked-up content that will be displayed to the reader. Do not be intimidated by this code, and you can simply copy and paste into your text editor with CTRL-C and then CTRL-V from this guide. Here is an example:
<?xml version="1.0" encoding="UTF-8" ?>
<!DOCTYPE html PUBLIC "-//W3C//DTD XHTML 1.1//EN" "http://www.w3.org/TR/xhtml11/DTD/xhtml11.dtd">
<html xmlns="http://www.w3.org/1999/xhtml" xml:lang="en">
<head>
<meta http-equiv="Content-Type" content="application/xhtml+xml; charset=utf-8" />
<title>Your Title Here</title>
</head>
<body>
Your Content Here!
</body>
</html>
After you copy and paste this code, save it as a .html file, such as myebook.html. If you are using Notepad++ as your text editor, it would look as follows:
Notepad++ HTML Example

Say you had a hypothetical story in your word processing program--quite possibly the world's worst, but suitable as an example. You could copy and paste it into the text editor program in between the <body> and </body> tags, which is where the content of your eBook should go. It would look like this in your text editor:
World's Worst eBook in a Text Editor
Note how every time there is a carriage return (achieved by pressing ENTER in the word processor), the text gets assigned a new line. Entire paragraphs of text should appear on a single line.

Tip: This manuscript contains curled quotes or fancy quotes, and they should appear in your text editor. If it is showing up as junk in your text editor, change the encoding to UTF-8 (under the Encoding menu for NotePad++).

Tip: The word wrap can be toggled on or off under the View menu for NotePad++. The preceding examples have word wrap turned on.

Since this is an HTML file, you can open it with your web browser. To open an HTML file located on your hard drive, simply press CTRL+O from within your web browser and locate the file. For this particular example, we have not applied any HTML markup to the content, so it will appear as one long string of text.
HTML with No Markup Applied

Obviously, this is not how you want your eBook to look at all. That is why it is necessary to encode all of your content into what is called HTML tags, so that a web browser and eReader knows where each paragraph or heading starts and ends.

Paragraph, Heading, and Div Tags


All well-formed HTML in the body section must exist within the opening and closing tags of block elements, which are HTML markups that make a rectangular object that does not break across lines. The most basic and frequently used example of a block element tag is the opening paragraph tag, <p>, and the closing paragraph tag, </p>, which wraps around a paragraph of text. An example is as follows:
<p>This is my paragraph of text. Hello, my friends!</p>
Notice how there should be no whitespace before the opening or after closing paragraph tag in your text editor. HTML syntax for all block elements follows similar rules: there is an opening tag <tag> and a closing tag annotated with a forward slash, </tag>.

The heading tags are used for block elements that are, you guessed it, headings. Heading tag range from <h1> down to <h6>. Typically, web browsers and eReading devices render <h1> tags the biggest and most important, <h2> the second biggest, <h3> the third biggest, etc. You will learn how to define the shape and size of headings when you learn about CSS. It is important to markup your heading content with these tags rather than simple paragraph tags, because it aids in search engine optimization. While search engine spiders going through eBooks is in the very early and rudimentary stages, it could become more important in the future. An example of properly marked-up content with heading tags would be as follows:
<h1>Title of my book</h1>
<h2>Chapter 1</h2>
<p>Content</p>
<h2>Chapter 2</h2>
<p>More content</p>
<h3>Chapter 2 Subheading</h3>
Important Note: The case of the HTML tags is important, and it should always be lowercase. The XHTML standard requires lower case tags, and the validation process for eBooks will require adhering to XHTML standards.

The <div> tag is a block element that wraps around other block elements. It is utilized to separate logical sections of content where you want to apply different types of presentation. For example, you may have several paragraphs of text in your eBook where you want a specific font. You would wrap the opening <div> and closing </div> tags around the three paragraphs, which are each wrapped in <p> and </p> tags. You will learn how to apply the presentation to the content within the <div> and </div> tags when you learn about CSS.

Now that you understand the basic concept of block elements, you can try applying them to your hypothetical story. The title should be wrapped in <h1> and </h1> tags, the chapter headings should be wrapped in <h2> and </h2> tags, and the content should be wrapped in <p> and </p> tags. The full HTML would look as follows in your text editor:
<?xml version="1.0" encoding="UTF-8" ?>
<!DOCTYPE html PUBLIC "-//W3C//DTD XHTML 1.1//EN" "http://www.w3.org/TR/xhtml11/DTD/xhtml11.dtd">
<html xmlns="http://www.w3.org/1999/xhtml" xml:lang="en">
<head>
<meta http-equiv="Content-Type" content="application/xhtml+xml; charset=utf-8" />
<title>Your Title Here</title>
</head>
<body>
<h1>The End of Days</h1>
<p>By Joe Selfpubber</p>
<p>Copyright 2012</p>
<h2>Chapter 1</h2>
<p>It was not a good time for the elves residing in the woods. The warlocks had poisoned their fields and stolen all their food, the bastards.</p>
<p>By the time the manuscript got around to the second paragraph, everyone but one elf was dead—what a shame!</p>
<h2>Chapter 2</h2>
<p>The elf approached the warlock and said, “Why do you poison our fields? Now you shall die.” He drew his scabbard and slashed at the warlock’s waist. The warlock perished.</p>
<p>The End</p>
<h2>About the Author</h2>
<p>Joe Selfpubber is trying to make it big by selling his eBooks on the Kindle Fire so that he can quit his lousy day job. Drop him a line at http://joeselfpubber.com sometime.</p>
</body>
</html>
Save your HTML file in your text editor, and try refreshing your web browser with F5. The HTML that is rendered in your web browser should look as follows:
World's Worst eBook with Proper Markup

While this may not be the prettiest eBook in the world, it is functional and encoded properly in HTML. Try using the HTML validator on the W3C website, and it should say that the document was successfully checked. If it fails validation, re-examine your code to see where you made a mistake. Writing HTML can be a very unforgiving process that leaves little room for error, so remain patient and keep trying to find where the bugs are located in your text editor. The validator will usually tell you what line of code is problematic and needs debugging.

Line Breaks and Horizontal Rules


The way HTML is rendered in web browsers and eReading devices is in a reflowable format. You can see this if you adjust the viewing window width of your web browser. The number of lines per paragraph will increase as the width of your browser window decreases. Occasionally, it may be advantageous to force a line break within a paragraph to ensure that a sentence begins on the next line (e.g. poetry).

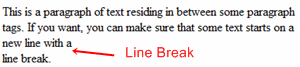
The HTML for a line break is simply the standalone <br /> tag, which is analogous to pressing SHIFT+ENTER in a word processing program. Some sample code would be as follows:

<p>This is a paragraph of text residing in between some paragraph tags. If you want, you can make sure that some text starts on a new line with a<br />line break.</p>
Example of How a Line Break Tag is Rendered

While the <br /> tag is useful in some situations, you should not use it to manually force whitespace between your paragraphs or force a page break in an eReading device. Utilizing CSS is much more appropriate at that task.

Important Note: Don't forget the forward slash at the end of the line break tag. All self-closing tags require a forward slash at the end to maintain XHTML validity.

Another example of a self-closing tag is the horizontal rule. This adds a horizontal bar across the width of the viewing window. These can be useful in the eBook design process when separating out blocks of text or for pull quotes. Like other HTML elements, these can be styled with CSS to give them different colors, different widths, shadows, and other features. For right now, let's learn about how to add them into the HTML markup of your content. You simply add the self-closing tag <hr />.

Perhaps you want to add a bar below the About the Author heading of your elf story. The HTML markup would look as follows:
<h2>About the Author</h2>
<hr />
<p>Joe Selfpubber is trying to make it big by selling his eBooks on the Kindle Fire so that he can quit his lousy day job. Drop him a line at http://joeselfpubber.com sometime.</p>
Example of a Horizontal Rule

This HTML code may seem trivial, but it is an important part of learning how your content needs to be marked up.

HTML Entity Names and Comments


Within your content, you may want to display the greater-than or less-than signs to the reader (i.e. ">" or "<"). However, if you try to write them in your text editor to appear as content, it will create serious problems for you and is improper HTML coding. This is because the greater-than and less-than signs function as reserved characters in HTML. When using them, the browser thinks your HTML is trying to form a tag, but in reality you are trying to display content. The same is true for the ampersand (i.e. "&").

As a workaround you can encode in your HTML code what is called an HTML entity name. The HTML entity name for the greater-than symbol is &gt;, the less-than symbol is &lt;, and the ampersand is &amp;.If you wanted a paragraph of your content to say, "4 > 1 & five is also < eight", the correct HTML would look as follows:

<p>4 &gt; 1 &amp; five " ' is also &lt; eight</p>
HTML entity names always start with "&" and end with ";", and a full list can be viewed here. Once upon a time, some eBook readers required that certain "fancy" characters (e.g. “curled quotes” , em dashes —, etc.) be converted into HTML entity names. Basically, any character outside of the ASCII set required conversion. This is not the case with any of the Kindle devices. Therefore, you can leave fancy characters that appear outside of the normal ones appearing on an English keyboard in your content.

Tip: If you are interested in converting your fancy characters into HTML entity names for older eReading devices, please have a look at the author's post on the subject from 2011.

It should be noted that for most HTML block elements if more than one consecutive space or a line break is utilized within the paragraph tag, the web browser or eReading device will render it with just one space. Therefore, if you had code that was as follows:
<p>This is a paragraph with a   lot   of   whitespace</p>
It would simply read "This is a paragraph with a lot of whitespace" within your browser. You can actually write the HTML across numerous lines within your text editor, and the browser and eReading device will render it the same. For some situations (e.g. poetry), you may want to add more than one space in between two letters. To accomplish this, you can the HTML non-breaking space entity name, which is &nbsp;. Try this HTML code in your text editor to see the difference:
<p>This is a paragraph with a lot of whitespace</p>
<p>This is a paragraph with a&nbsp;&nbsp; lot&nbsp;&nbsp; of&nbsp;&nbsp; whitespace</p>
Example of Using the Non-Breaking Space

HTML entity names may look nasty in your text editor, but the reader is oblivious to them if they are encoded properly.

You as the eBook designer may want to leave a few notes for yourself inside your HTML code. However, you do want this to render in the browser. To add a comment you simply use the opening tag <!-- and the closing tag -->. An example from the elf story would be as follows:
<p>By the time the manuscript got around to the second paragraph, everyone but one elf was dead—what a shame!</p>
<!-- I gotta come back and fix these headings with some CSS -->
<h2>Chapter 2</h2>
Example of a Comment Being Ignored by the Web Browser

The content within the comment tags will be completely invisible to the user, because the browser or eReading device does not process anything within the comment tags.

Next Post: Working with Images
Share/Bookmark

January 19, 2012

How to Design an eBook for the Kindle Fire - Introduction


Thank you for visiting this eBook design tutorial. We now have an eBook design startup—BB eBooks—dedicated to helping independent authors and small presses get their eBooks formatted, converted, and ready for sale at all the major online retailers (e.g. Amazon's Kindle Store, Barnes & Noble's Nook, iBookstore, Smashwords, etc.) Please contact us for a no-obligation quote. For those writers, editors, and publishers looking to go the DIY route for eBook production (you probably are if you visited this page), we offer free online tutorials and apps to help you professionally design your eBook. Please visit our Developers page and let’s work together to improve the overall standards of eBooks. Also, please sign up for the mailing list for promotions, design & marketing tips, plus eBook industry news.


Looking for a complete guide on eBook design and development? Please consider The eBook Design and Development Guide, which contains everything you need to know about HTML, CSS, EPUB, and MOBI/KF8 to make an eBook like a pro. Pick it up at Amazon for $6.99 today.

Amazon Conquers All

To paraphrase the late Frank Sinatra, it's Amazon's world and we just live here. Love it or hate it, the Amazon Kindle store is the place to make money selling your eBook, especially if you are a self-publisher or small press. There are other vendors online that can sell your eBook: Barnes & Noble Nook, the iBookstore, and Kobo to name a few. However, no one provides that online shopping experience to a massive amount of consumers quite like Amazon. It is estimated that Amazon has approximately 60-70% of the market for eBooks. With the launch of the Kindle Fire tablet and other programs, such as Kindle Prime and Kindle Select, Amazon has further expanded their control of the eBook market and squashed competition. It has been announced by Amazon in a press release that they sell over a million Kindle Fires per week, not to mention an absurd amount of eBooks that surpasses even their print book sales.

The Rise of Self-Publishing

Once upon a time, publishing a manuscript required submitting to dozens of publishing houses and agents and getting rejection slips months later. The launch of the Kindle Direct Publishing program (KDP) has been an incredible game changer for the way people distribute and consume the written word--authors and small presses to reach millions of customers immediately. As an example, famed self-publisher, Joe Konrath, made $100,000 selling eBooks in the first three weeks of January 2012. Achieving even a small percentage of that success might allow you to quit your day job and retire off the royalties.

When selling your eBook on the Amazon Kindle store, you get 70% of sales if your eBook is priced $2.99 or higher, and 35% if priced below $2.99. There are a few caveats, such as the "delivery cost" based on the size of your eBook and whether your eBook was sold to international customers. Nevertheless, it is much better than the 15% royalties authors receive from the traditional publishing route, if the publishing house even bothers to tell you how many sales there were. Look at this excellent report on self-publishing from Piotr Kowalczyk for 2011 to see that there is serious money involved. So, what are you waiting for? Let's get that manuscript turned into an eBook and make a few bucks.

Why eBook are Different from Their Printed Cousins

Perhaps you think that making an eBook is as simple as running your Microsoft Word or Open Office manuscript through a software program and uploading it directly to Amazon. If you try this method, you and your customers will be incredibly disappointed with the results. Authors spend hundreds of hours writing their book, an editor spends hundreds of more hours fine-tuning the work, and a significant amount of time and resources are spent marketing the book. However, no attention to detail is paid to how the eBook looks to the reader in many cases.

Unfortunately, there is a serious lack of quality when it comes to eBooks at the moment, and it is not limited to the frequently derided self-publishing community. The Steve Jobs biography published by Simon & Schuster was pulled due to formatting blunders. This is unacceptable. Your readers are your customers, and they deserve the best possible experience for their hard-earned money.

To understand why it is essential that you don’t convert eBooks directly from your word processing software into an eBook format, eBooks have to be envisioned completely differently than regular documents.
A typical document in your word processing software has the following characteristics:
  • Fonts, color, and justification defined by the author
  • Number of pages defined by the author
  • Fixed margins
  • Fixed page size (usually A4 or 8.5″x11″)
The regular document that you have created in your word processing software can be defined as “What You See Is What You Get” or WYSIWYG. Word processing software is great for preparing reports, working on your manuscript, and sharing amongst friends in emails. The .doc format created in Microsoft Word and the .odt from Open Office are examples of a WYSIWYG document that can be easily changed. The PDF format is an example of a finalized WYSIWYG document that cannot be easily changed.

However, eReader devices come in all shapes in sizes, ranging from a big desktop PC down to a tiny iPhone. Amazon makes the Kindle app available for a wide variety of devices, not just the Kindle Fire tablet and the e-ink Kindles. Fixing the document with a set font size, number of pages, and margins for display on a PC would prove to be a very poor reading experience for someone using an iPhone.
Therefore, eBook formats have evolved to have the following characteristics:
  • Defined font, color, and justification by the reader
  • No defined number of pages (i.e. no page numbers)
  • Page size based on reader’s device
  • Reflowable text
By allowing these flexible characteristics in eBook formats, readers can have an enjoyable experience no matter what type of device they are using. Because word processing software favors a fixed approach, it is necessary to strip all the predefined formatting within the word processing software and convert your document into formats that are suitable for all eReading devices.

Reflowable eBook formats use HTML (Hypertext Markup Language) to define content and CSS (Cascading Style Sheets) to define how the eBook is designed. There is also some extra code called XML (eXtensible Markup Language) that dictates the metadata (e.g. the author of the eBook, the description of the book, etc.), structure, and the table of contents. Even if you've never heard of HTML or CSS, you probably use it every day. HTML and CSS are the basic languages of websites. Essentially, an eBook is one big website with a bunch of metadata thrown in. This allows for reflowable content on all eReading devices of different shapes and sizes.

eBook Format Wars

While eBooks didn't really become popular until the Kindle was launched in 2007, they've actually been around for quite a while. There have been a lot of different formats over the years, but today there are only three major ones that utilize reflowable content suitable for eReading devices: MOBI (i.e. the old proprietary Amazon format), KF8 (i.e. the new proprietary Amazon format), and EPUB. To make things really confusing, the MOBI and KF8 format are merged into one file with the .mobi extension, which is sort of based on EPUB. Regardless, eBook formats are just a package of all the necessary content and metadata into one big file.

Amazon bought out Mobipocket in 2005, the French company that developed the MOBI format. This proprietary format is used by the Kindle devices that utilize e-ink technology, including the original Kindle (the clunky white squares), Kindle 2, Kindle DX, Kindle 3, Kindle 4, and Kindle Touch. While the MOBI format is okay for simplistic eBooks, it really falls short when it comes to complex layouts, such as wrapping text around images.

The EPUB format was developed as an open format by the International Digital Publishing Forum, which is a group of people from the technology and publishing sectors. It is superior to the MOBI format in terms of being able to display graphics, render complex layouts, and add elements of interactivity. The EPUB format is utilized in the Barnes & Noble Nook store, iBookstore, and just about every vendor except Amazon. Furthermore, the EPUB 3 specification was finalized in October 2011, and it promises to pioneer eBook innovation in terms of video/audio support, complex mathematical data, and better interactive features.

Sensing that it needed to upgrade the capabilities of its own eBook format, Amazon released the developer guidelines for the new KF8 format in January 2012, designed for use on the Kindle Fire tablet. KF8 provides a number of much-needed upgrades to the old MOBI format that permits more control over how graphics are displayed, fonts are rendered, and numerous other improvements to enhance the reader experience. One good feature about the KF8 format is that it is a single file that will work on both the Kindle Fire and older e-ink Kindles, which was an initial concern for some authors. However, the full design capabilities can only be seen on the Kindle Fire.

It is a bit frustrating that there are all these different formats in existence; but, the good news is that once you master designing and encoding the EPUB format, it is easy to convert your eBook into the old MOBI and KF8 formats by using a program developed by Amazon called KindleGen.

eBook Workflow

Writing is the hard part that requires creativity, experience, and a self-deprecating yet positive attitude achieved after getting your face stepped on one too many times--it takes years to become a good writer. However, eBook design requires a little bit of technical skills, attention to detail, and some patience--it takes a few days to be able to design a functional eBook. The basic workflow for turning your manuscript into a beautiful eBook for the Kindle Fire is as follows:
  1. Convert manuscript from word processor into a text file
  2. Turn text file into HTML
  3. Add images and tables
  4. Add eBook design features with CSS
  5. Create metadata files
  6. Create a table of contents
  7. Package eBook into a single EPUB file
  8. Convert EPUB file into the MOBI/KF8 format with KindleGen
While this may seem a bit intimidating if you aren't a nerd, it is certainly within the realm of possibility for anyone with basic computer skills and patience. The best part is that once you learn how to design an eBook, you'll have learned a valuable skill that will save you money and time. If you can write a book, you can do get your eBook ready for the Kindle Fire, so let's get started.

Up Next, We'll Learn About HTML

But first, let's have a look at some of the fun new things that the Amazon Kindle Fire can do that the old Kindles couldn't:
Drop Caps and Small Caps for the Top Line
Floated Images

Text Boxes with Rounded Corners and a Shadow
Embedded Fonts
Gradient Coloring
Support for Nested Lists
Background Imaging
(note: this example is worse than my old MySpace page, but you get the idea)

So stick around, and let's figure out how to do make your eBook utilize all the new features that the Kindle Fire can support.
Share/Bookmark

January 18, 2012

SOPA Blackout

We live in an unfree world of tyrannical dictators, business regulations crafted by the largest corporations, and seatbelt laws. Why would we threaten the most free thing to ever come in existence? The internet, which allows us to spread information without regard to national borders, cultural disparities, and physical differences, is under attack from the jackals in Washington. SOPA, and its nasty little sibling PIPA, would give the US government vast and intrusive powers into the flow of information, which is something you should be scared about.

Reason compares SOPA to a "Great Firewall" but in the United States. Chuck Wendig talks about why SOPA is a nightmare for writers and artists, the people this turd of a bill is ostensibly trying to "protect". Chris Meadows at Teleread talks about disgraced Senator Christopher Dodd (remember the Friends of Angelo fiasco during the sub-prime crisis) shilling for the MPAA.

We'll be starting a series on How to Design Your eBook for the Kindle Fire soon, but I wanted to make this public service announcement.
Share/Bookmark